Approvals & Defects
The Approvals & Defects view shows all effective approvals and defects for the node selected in Test Plan or Repository.

For reconciliation tasks, approvals and defects on the task and all parent nodes are shown. The list of records is filtered to approvals and defects on columns that affects the reconciliation.
For groups approvals and defects on the group, all parent nodes, and all child nodes (recursively) are shown. Approvals from child nodes are not strictly applicable to the selected node, but they are included to provide an exhaustive list of approvals and defects for all reconciliations in the
If the selection includes a Test Case Reference, approvals on groups and tasks inside the target test case (excluding the test case itself) are also included.
Pre-defined column tolerances are shown in the approvals view to provide a comprehensive picture of what differences are allowed to automatically pass when running the reconciliation.
The Approvals & Defects ribbon menu allows you to filter approvals or defects, converts defects to approvals and vice-versa, deleting records, as well as creating manual defects and approvals.

The view displays all approvals for the selected node, which includes approvals and defects made on template test cases referenced within the selected branch., Because they are effective for all references to that test case, such records are considered “global”, are displayed with a dimmed background and you cannot edit, delete, or convert them. To manage global approvals and defects, select the concrete test case or task (instead of the reference) and manage them from there.
Manual Approvals & Defects
From the Approvals & Defects ribbon menu you can create manual approvals and defects. The created record is attached to the currently selected node. If the node is a group, the approval will be used by all reconciliations within that branch, recursively.
To for example create a new defect, click the New Defect ribbon button. The New Defect window is opened:
Sheet name
Select a sheet name from the drop down or type in the name of the sheet. If you are creating the defect on a reconciliation task, setting sheet is mandatory and you must select one from the drop-down. For approvals and defects on groups, the sheet name can be omitted, making it applicable to any sheet of any reconciliation (provided that the configured keys and rules match).
Keys
Configure keys by adding rows to the table and selecting key column and a value for the key.

Order
If you are creating the defect on a reconciliation task you can set the order, i.e., the N’th match of a non-exclusive key.
Rules
Rules are used to further specify what rows are covered by the defect but are more flexible because they can operate on non-key columns. A rule consists of an expression with a left link, an operator, and a right link. The defect (or approval) is applicable to the row if all rules evaluate to true.
To configure a rule, add a row to the rules table.
Select modes for the left and right link

- Value: A static value.
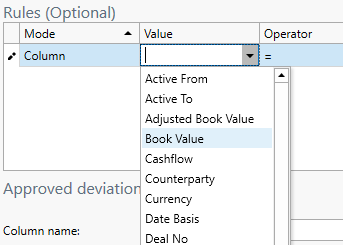
- Column: Lets you pick a column to extract the value from.
- Reference column: Same as Column, but if the Target and Reference values don’t match, the Reference value is used.
- Target column: Same as Column, but if the Target and Reference values don’t match, the Target value is used.
Select values

In the column modes, select a column to extract the values from.
In the Value mode, type in a value in the textbox. To enter a date in the correct format, use the date picker button.
Note that both static and column values are compared as string values when the rule is applied, so you need to be careful with how you enter values. For example 1.00 <> 1.0.
Select the operator

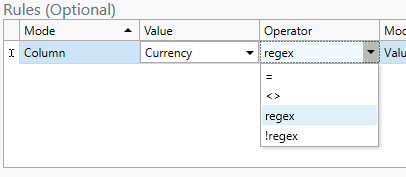
You can set the comparison operator to equals, not equals as well as regex and not regex. For performance reasons equals and not equals should be preferred, but regex can be quite useful if you for example want to match on a set of portfolios following a specific naming convention:

Rules allows you to construct powerful approvals and defects, but note that rules are substantially slower than keys, so try to use keys as far as possible.
Configure the deviation
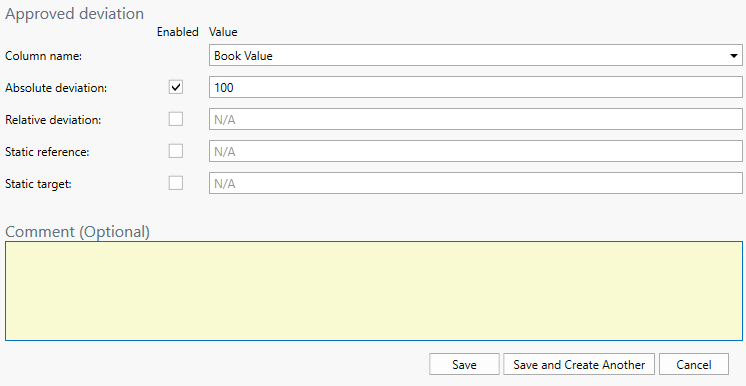
Select a column to approve/document defect for and configure a combination of numeric and static values.

Static deviations (string deviations) can be configured with a wild card to indicate that any value is acceptable.

The above configuration says that if the reference Currency value is “EUR”, we don’t care what the target value is, which is also indicated by the alert triangle.
If both Static reference and Static target are set to "%", any combination values are acceptable. If you are creating a defect you may simply want to document that the currencies got messed up in the migration, but if you are creating an approval, consider instead setting the column role to None in the reconciliation for a clearer expression of intent.
Updated 9 months ago