XML File
Use this source to query data from an XML file.
Supported Formats
In order to use this query, the XML must be in a format supported by OmniFi. An example of the supported XML format is shown below.
<Data>
	<Row>
		<Col name="portfolio_id" dispName=”Portfolio” value="ABC-FX"/>
		<Col name="client_id" dispName=”Client” value="ABC"/>
		<Col name="amount" dispName=”Amount” value="123"/>
	</Row>
	<Row>
		<Col name="portfolio_id" dispName=”Portfolio” value="CDE-FX"/>
		<Col name="client_id" dispName=”Client” value="CDE"/>
		<Col name="amount" dispName=”Amount” value="456"/>
	</Row>
</Data>
Data Node is required to keep the dataset together. In this example, the data node has been set to “Data”, although other names may also be used.
Row Node defines the beginning and the end of a row. In this example, the row node has been set to “Row”, although other names may also be used.
Column Node defines one value in the dataset. In this example, the column node has been set to “Col”, although other names may also be used. The information is defined as attributes to the node
- Name defines the name of the column (Required)
- dispName defines a display name for the column (Optional)
- value defines the value (Required)
Supported formatsXML files that are not in the above format may still be used in the query. In these cases, XSLT formats are used to convert the unsupported format into the supported one.

To create a new XML Query in the Query Configuration Wizard, follow these steps:
Step 1: Select Query Type
Select the Fixed Width File query type from the list of data sources and optionally specify a name and output destination in the the top half of the Options page.
Step 2: Choose Path & Mode
Choosing the Mode and Path for a XML File Query is similar to that of an Excel Worksheet Query. See article Excel Worksheet.
The path may also be set to HTTP or HTTPS paths to access online resources.
Step 3: Using XSLT Formats
This step is only needed when querying for an XML file that is not in the format supported by OmniFi. Using the XSLT Format converts any XML file format into the one which is supported.
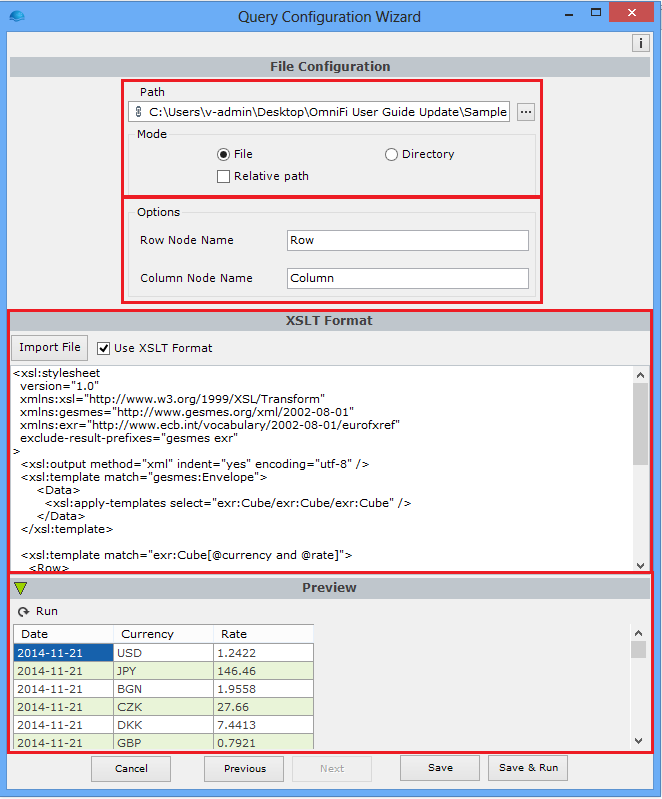
To use the XSLT Format, tick the Use XSLT Format box. This unfreezes the Import File as well as the XSLT Format space below. You can either import an XSLT file using the Import File button or type it in the space. When importing, the file will show up in the XSLT Format space. In the Preview window at the bottom, clicking on Run will show a preview of the output given the XML and XSLT files being used. The figure above illustrates these.
Step 4: Finalizing the Query
Choose Save to save the query without running it, or Save & Run to save and execute the query. If query output is defined then you will see your output in Excel.
Defining data typesData parsed from text files like this will be interpreted as String by default. If this type needs to be changed to others such as Double, DateTime, and Boolean, this can be done in the Report Editor.
Updated 9 months ago