Defining a Reconciliation
A reconciliation is defined in a file with the extension .recon. It is created in the Reconciliation Board based on reports defined in a workbook.
The Reconciliation Board uses reports to fetch data from each source. This means that you have all the tools of the reporting module at your disposal when defining data sources to use for reconciliation (see Reporting for more details).
This section does not cover how to create reports, instead we will assume you have two report workbooks available.
As mentioned above, the menu EDIT provides the tools necessary in configuring a reconciliation. To configure, follow the steps below.
Choosing Source Data
Open Source Data view from EDIT > Source Data on the application menu. It will consists of two sections representing the two sides of the reconciliation.
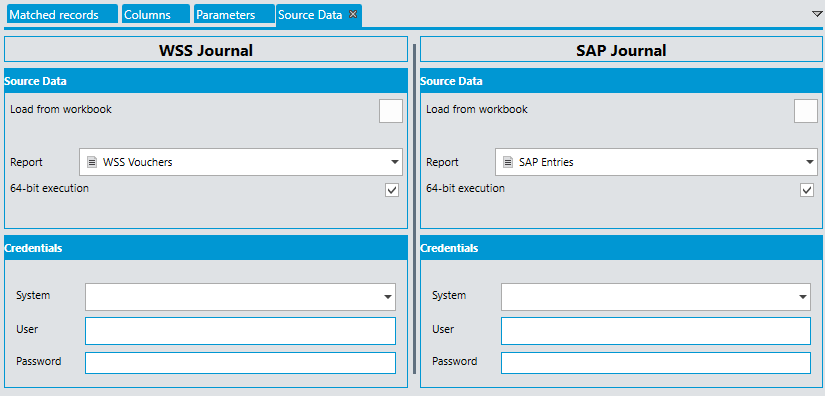
Use the Load from workbook button on each side to select an Excel workbook from which to load the report. The Report drop-down will be populated with all reports available in the selected workbook. Select one report for the left- and right-hand sides respectively.
You can name each side as you like by changing the headers at the top of the Source Data view. The names you chose for the respective datasets will be used to represent that dataset in the application.
The option 64-bit execution determines whether the data should be collected using a 64- or 32-bit worker. In general, set the same bitness as your Excel installation, as this ensures compatibility with any workbook or database queries.
Excel workbook queries can only be run on the same bitness as your local Excel installation, and database queries has to be run on the same bitness as the ODBC driver.
64-bit mode supports much larger data volumes, so if you expect large peak volumes (>200K records) you should use 64-bit mode.
- If you use Excel workbook queries, set to the bitness of your Excel installation.
- If you use database queries, set to the bitness of the used ODBC DSN.
- If you expect very large data, set to 64-bit mode and adjust the Excel installation and any DSN data sources accordingly.
The Credentials section is used to define what target system to fetch data from, and the login account used to fetch the data. If you leave this blank, the credentials entered by the user when starting Reconciliation Board will be used.
Configuring Parameters
Most reports will require input in the form of parameters. To configure how parameters are used, click the EDIT > Parameters button on the application menu to open the Parameters view.
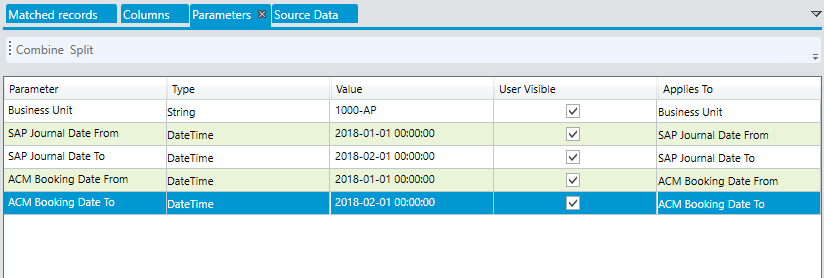
All parameters required by the reports selected as source data are listed in the Parameters view.
Setting Parameter Values
Values for parameters used during reconciliation are set in the Parameter View.
Default values for parameters are shown in the Value column, and you can change the default value to fit your requirements.
You can also set a list of values to a parameter. To do this you simply type in a semi-colon separated list of values, enclosed in parenthesis. As an example, fetching data from multiple accounts for a single reconciliation would look similar to this: (1-1234-1; 1-1234-2; 1-1234-3)
Hiding Parameters
You can select whether the parameter should be visible to the user. If you are creating a reconciliation that will only ever be used for a single account, you can hide any Account parameter. You can hide a parameter from the user by unchecking the User Visible checkbox. The user cannot change the value of hidden parameters, and the default value set is used.
Combining Parameters
You can combine parameters of the same type, for example, if you want a Start Date parameter to assume the same value as End Date to yield a single day period. To do this, you select two parameters from the list and click the Combine button. If you want to split a combined parameter again you can select it and click Split.
Configuring Columns
After you have configured the source data and parameters, you need to configure how the columns from each side of the reconciliation is used. Start by clicking TOOLS > DATA > Refresh to fetch data into the application to make the reconciliation board aware of what columns you have available.
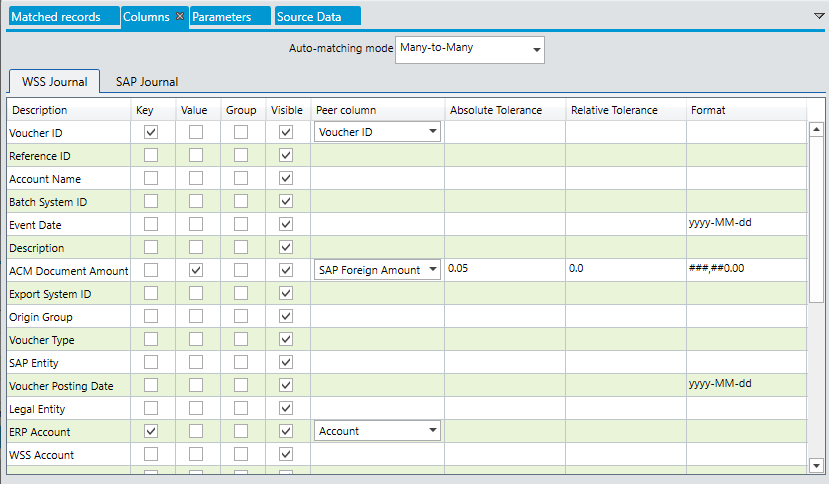
The columns view shows all columns from both left- and right-hand sides. The configuration is driven from the left hand-side. For each column, you can select whether it should have the role Key, Value or Group, as well as whether it should be visible to the user, and the format of the data in the column.
Key Columns
Keys are identifiers of each record used to decide which records from the left and right sides that belong together. They are primarily used in auto-matching. You can set up as many keys as you want, or none if you prefer.
A key effectively links records in the left and right sides, indicating how they relate to each other. The relation between the left and right sides is configured in the Peer Column setting.
It is important that the key columns from the left and right sides match exactly in value. In cases where keys between the two sources do not match by default, mapping logic has to be employed in the underlying report.
Keys are used when auto-matching to identify records that should match. When used as key, records on different accounts will never be auto-matched. They can however be manually matched, but a manual amendment with approval is required.
Keys do not have to uniquely identify single records, instead you can configure keys to identify minimum equality between left and right, for example, “at minimum the account has to be the same”. With an additional configuration of Date and Amount as values, Reconciliation Board will identify matches between left and right that satisfies the minimum equality.
In a case of Many-to-many auto matching, the Reconciliation Board will compare the sum total of values with the same key on the left to the total sum of values of the corresponding keys on the right.
Value columns
The column role of Value indicates that the column is a nominal value for each record. Values are similar to keys in that they define what data from the left hand side should be compared to the right hand side of the reconciliation. For this reason each value column must be configured with a peer column, indicating what columns should be compared between left and right.
The Reconciliation Board always compares the sum total of the left hand side of a match to the sum total of the records on the right-hand side, regardless of how many records are included on each side. For this reason, only scalar values may be used as values, including numeric values and dates.
Value columns can also be configured with tolerances, both absolute and relative to the match sum total. Tolerance is used in matching to define the maximum deviation allowed between left and right. Both absolute and relative tolerance must be satisfied in a match for a match to be automatically created. A match where one or both of absolute and relative tolerance is exceeded must be manually approved.
Group columns
Whereas Key and Value are mutually exclusive roles, any column can be configured as Group, regardless of whether it is also used as key or value.
Groups are used to organize records on the left-hand side for the benefit of the user, and are not considered in matching logic.
Groups can be used as filters in the Unmatched view, allowing the user to focus for example on a single account out of many. Also, the Summary sheet is organized according to the grouping configured.
Format
You can apply custom formatting to each column by typing in a format string in the Format field of each column. For numeric values, you can type in 0,0.00 to display the column with two decimals and a thousand separator. For dates you can type in yyyy-MM-dd to get ISO formatted dates without time stamp.
Auto-matching Mode
In the Columns view you also select the auto matching mode. There are three options: no auto-matching, One-to-one, or Many-to-many.
- One-to-one matching looks for single records from left and right (with matching keys) that match within tolerance.
- Many-to-many matching calculates the sum total of records within each key on the left-hand side and compares to the sum total of records with the matching key on the right-hand side. If the comparison is within tolerance, a match is created.
For manual matches, the matching mode is disregarded. Any number of records is allowed in a match that is created manually.Reconciliation board will, however, use Many-to-many matching logic to decide whether the match created is within tolerance, or requires a manual approval.
Updated about 1 year ago