Introduction
Data processing provides a way to create, fetch, and update data in systems using an Excel syntax. It is especially useful when fetching, creating, or changing large amounts of data in the system at once.
General Structure
Data processing consists of blocks, which are essentially functions. They start with what is called a start keyword and end with a terminator. A block can contain several sub-blocks, i.e., it is possible to have functions within functions.
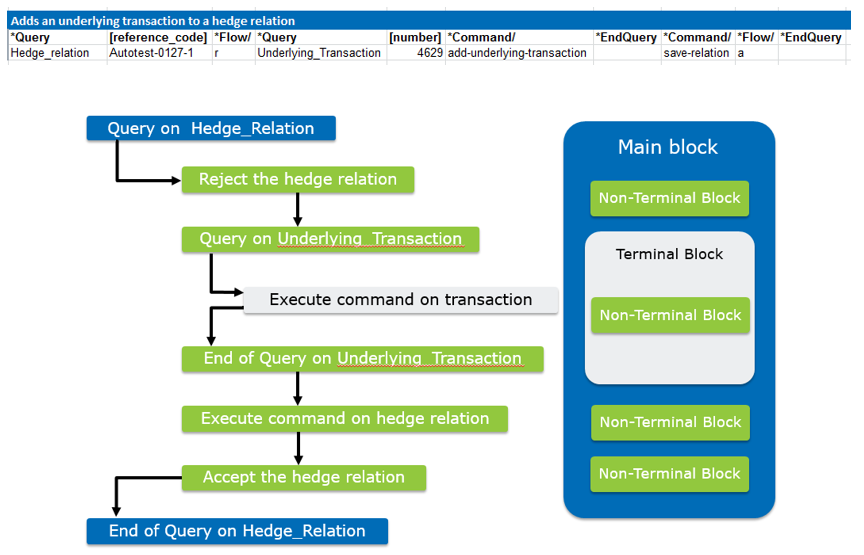
These blocks are executed one by one in the order that they appear in the header row. Through this order, the user is able to decide when to execute what action. The figure below shows a simple header which adds an underlying transaction to a hedge relation.
The graph displays the blocks existing in the header.

Creating a Data Processing sheet
To create a data processing task;
- Create a Start sheet. See section Start Sheet for more details.
- Create the necessary data sheets. See section Data Sheets for more details.
- In the data sheets, configure the Services and Options. See Services and Options for more details.
- In the data sheets, configure the Keywords and Arguments, as well as the data to be processed. See Keywords for more details.
- Ensure that the control column contains the correct values. See Control Column for more details.
- To execute, press either the Run Sheet or Run Document in the OmniFi Autotest tab, depending on whether you want to run a particular sheet or the whole Excel document.

Excel Ribbon Menu for Data Processing
A Data Processing task launched from Excel can be stopped by pressing the “Stop” button, which is found in the OmniFi Excel Menu.
Testing use case
Data processing is an integral part of the testing functionality of OmniFi, traditionally used to import and manipulate test data for querying and reconciling with a reference source.
In some cases, however, the steps of querying and reconciling the data can be omitted and data can be verified directly in Data Processing using the Assert keyword. This makes for a simpler and more lightweight testing process. The basic process is as follows; In a single header:
- Import or
*Createthe entity (e.g. Transaction) according to the business process you are testing. - Apply
*GetValueson all fields that makes up the relevant state of the entity (e.g. the Transaction State field if you are testing the transaction flow). - Apply
*Asserton each field of the state comparing it to expected result.
If and only if the Assert succeeds will the row be successful.
Negative testing
Negative testing is applicable to e.g. permission testing, where you want to assert that user ‘A’ does not have permission to perform action ‘X’. Using a combination of *Try and *Assert it is possible to define negative test cases. The process is similar to that of positive testing; In a single header:
- In a
*Try-block, import or manipulate the entity (e.g. Transaction) according to the business process you are testing. - Apply
*Asserton the$errorvariable with a regex (%) operator and a value identifying the expected error (e.g. “does not have permission to” if you are doing permission testing).
Updated 9 months ago