Creating Reports
Reports are created through the Excel interface of OmniFi. Any user with access to the plugin can create their own reports or modify reports that they have file access to.
To create a new report, follow these steps:
Creating a new Report
Step 1: New Report
Go to the OmniFi tab in Excel and choose New under the Reports section. If you have not previously logged in, a Login window will prompt you to do so.
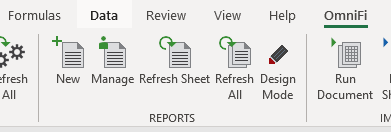
Reports section in Excel
Step 2: Selecting Report Type
A Report Type selection window will pop up. Choose between a Table Report and a Cube Report (see Cube Reports for more details) and press OK.
Step 3: Selecting Base Data
In the following window, select the dataset upon which to base the report on and press OK. In this step, you can either choose to create a new query by selecting <Create New Query ..> or choose an existing dataset, which can either be a saved query or another report.
When choosing existing queries as datasets, note that some queries can have multiple datasets. A Transaction Board query, for example, can have Main, Header, Cashflow, Schedule, and many more. For these queries, remember to choose the correct dataset from the list.
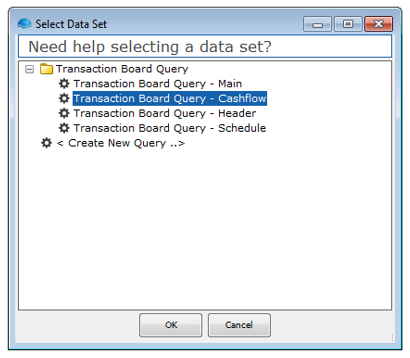
If the top folder is chosen, such as Transaction Board Query in the above example, the default dataset to be used is Main.
Report Editor
The Report Editor is the primary tool used to create reports in Omnii. It consists of three main areas:
- Preview Area that displays a preview of the report
- Modifier Stack that lists the chosen modifiers
- Modifier List that lists the available modifiers
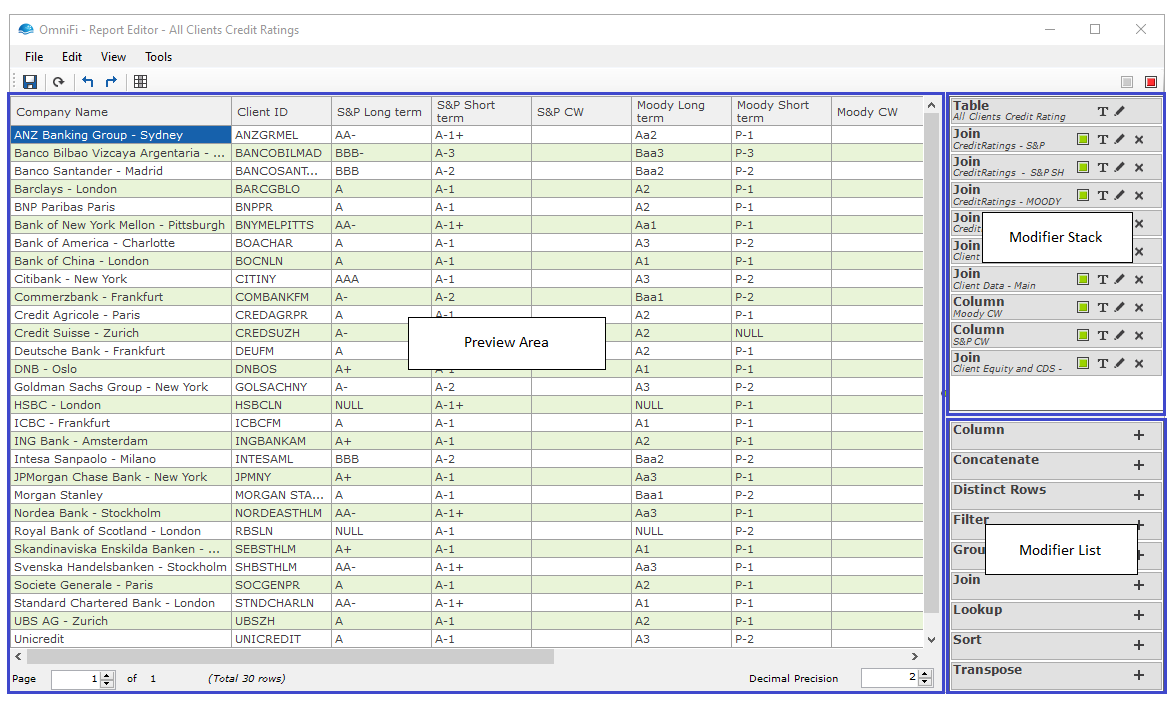
Report Editor Layout
On the top left of the Editor is the menu where you can find the following:
- File allows you to Save the current report (and write the output to Excel) or Quit Report Editor
- Edit allows you to Undo, Redo, Duplicate a modifier or Execute the report. The Execute is used, for example, if you have modified a query from the Query Manager and want the Report Editor to reflect the changes.
- View allows you to choose whether to Output Headers or not and allows you to turn on and off Design Mode.
- Tools opens the Column Editor
Configuring Report Output
After choosing the underlying dataset, a preview of the results will be displayed in the Report Editor where configuration of the report can be made.
To configure the report, double click on the Table or Cube at the top right of the Report Editor to launch the Configure Table (or Cube) Report window. The following options can then be set:
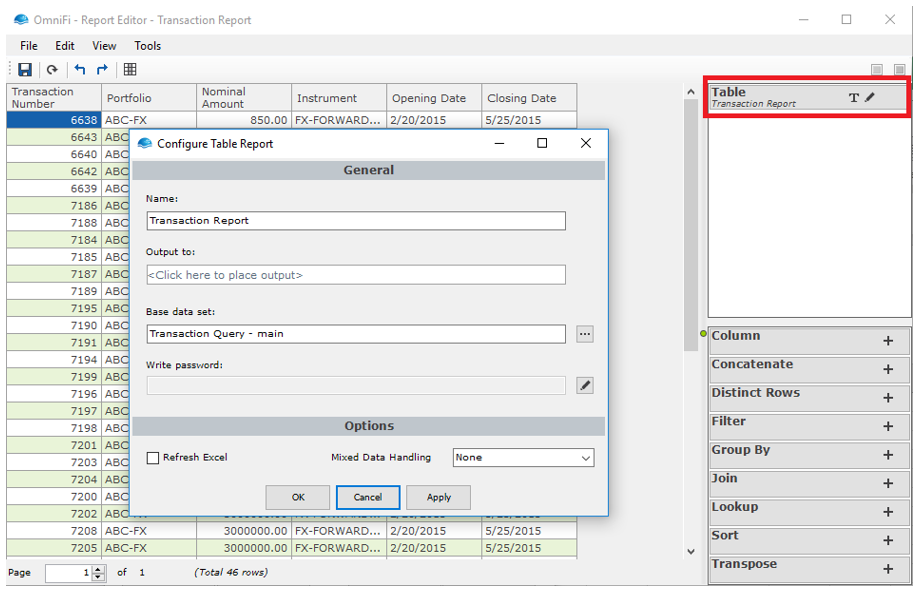
Report Editor
- Name specifies the name of the report. Although optional, this step is highly recommended as it makes it easier to distinguish between different reports, especially in the same workbook.
- Output to indicates where the report will be displayed in the Excel workbook. This can be set by first clicking inside the box, then clicking a cell in the active workbook that will serve as the uppermost left corner of the display.
- Base dataset shows what data the report is based upon. To change, click on the button and choose the new dataset to use.
- Write password makes it possible to lock a report so that a password is required before displaying the results in the worksheet. To enable, click on , type the password, and click OK.
- Refresh Excel enables the update of Excel components whenever the report results are written to Excel. This is very useful, for example, when using pivot tables.
- Mixed Data Handling defines how to handle column values that does not match the column type. Default is “None” and allows values that does not match the column type. “Null” will silently set values of the wrong type to null and “Error” will give an error message.
Mixed Data Handling must be set for reports that are published as OmniFi API resources.
Saving Reports
You can save the report by clicking on the save button or going File -> Save. Note that saving is also what writes the results to Excel if an output is defined.
Note that to save reports, you must also save the Excel workbook. Even if reports are saved, if the Excel book is not, reports or any changes to saved reports will be deleted once the Excel book is closed.
Report Modifiers
Modifiers are a range of functions that can be used to transform data in the Report. Applied modifiers are displayed in the Modifier Stack and the available modifiers are found in the Modifier List (see Creating Reports for reference)
OmniFi supports a range of modifiers that enable transformation of the datasets:
Modifier | Description |
|---|---|
Column | Adds a new column to the dataset where calculations can be performed |
Concatenate | Merges two datasets together vertically (adding rows) |
Distinct Rows | Removes duplicate rows |
Filter | Filters out rows that matches a specific criteria |
Group By | Pivots data and groups it |
Join | Merges two datasets together horizontally (adding columns) based on one or more keys. |
Lookup | Merges two datasets together horizontally (adding columns) based on one or more keys. |
Sort | Sorts rows |
Transpose | Transposes report output |
Adding Modifiers
To add a modifier to the report, either drag & drop the modifier from the List to the Stack, double-click the on the modifier, or click on the + next to the modifier. Removing an applied modifier can be done by pressing the x.
Editing Modifiers
Once a modifier is added, it often needs to be configured. The configuration window, which differs depending of the modifier, can be opened by either double-clicking on the modifier or clicking the pen-icon.
When editing modifiers, using the Apply button executes the modifier without closing the configuration window.
Enabling and Disabling
Individual modifiers can be enabled or disabled by clicking on the Enable/Disable check-box. Green indicates that it is enabled, while blank indicates that it is disabled.
Alternatively, you can also enable and disable all modifiers on the stack by clicking on the Enable All or Disable All boxes at the top right of the Modifier Stack.
Comments
It is possible to add comments to modifiers, such as descriptions of why they are used or how they modify the report, by clicking on the T icon. This is especially useful in keeping track of the logic in the report and makes it easier for others to understand how it was built.
Configuring columns
You can configure what columns from a report are shown, in what order as well as converting data types and apply formatting in the Column Editor tool accessible from the Report Editor menu.

Opening the column editor
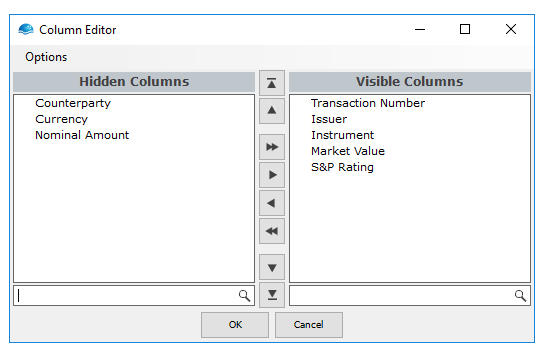
Column Editor is used to show or hide columns, arrange the order of columns and more
Showing and hiding columns
You can show or hide in the report by moving the listed columns between the Visible Columns and Hidden Columns list. You can drag-drop columns between the lists, use the buttons or select a range of columns in either list and move them to the other list by pressing the space bar.
Changing order of columns
The order in which columns are output can be arranged by sorting the Visible Columns list. You can select a range of columns and drag-drop them in place, or move them up or down using the keyboard commands:
Alt-Up				– Move up
Alt-Down			– Move down
Control-Alt-Up		– Move to top
Control-Alt-Down	– Move to bottom
You can also rearrange the column order directly in Report Editor by dragging the column headers in place.
Changing column headers
You can change the visible column header by right-clicking the column and selecting Rename, or using the keyboard shortcut F2. You can also rename columns directly in Report Editor.
Converting data types and formatting
You can convert column types by right-clicking the column and selecting Change Column Type.
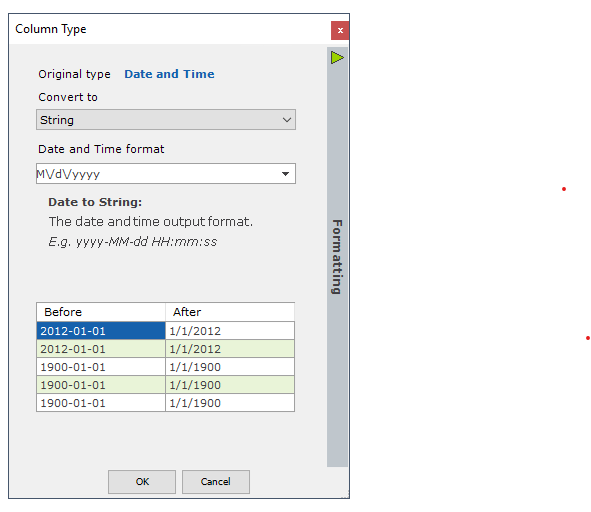
The Column Type tool allows you to convert columns by selecting a target type in Convert to. Converting to and from String allows you to enter formatting options in the box below.
When converting to the String type, the formatting panel is enabled, allowing additional formatting of the output string.
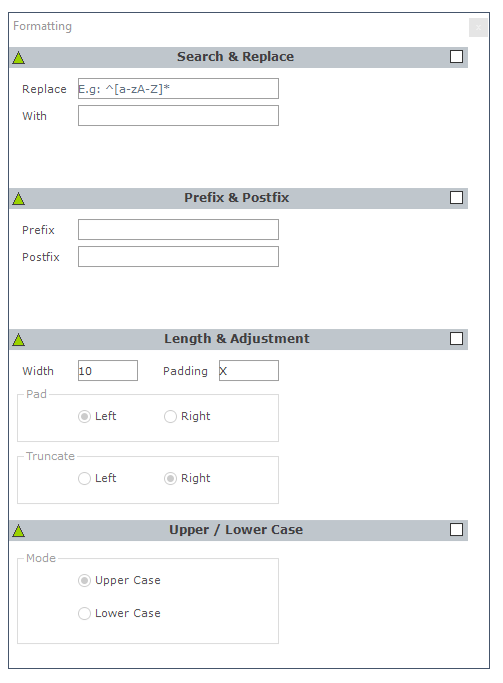
You can enable each formatting option using the associated checkbox. Formatters are applied top to bottom. You can change the order of the formatters by grabbing the header of the formatter and dragging it into the desired position.
Available formatting options are:
- Search and replace - Allows you to replace strings using regular expressions.
- Prefix and postfix - Adds prefix or postfixes to the column data.
- Length and Adjustment - Allows you to truncate the column data or pad it to a specific length to produce a fixed-width column.
- Upper or Lower case - Allows you to change the column data to upper or lower case.
Updated 9 months ago