Entity Board
The Entity Board data source is used to query a variety of different Wallstreet Suite applications that behave similar to a Transaction Board. The supported applications/sources are:
- Call Money/Call Accounts
- Collateral
- FIN Messages
- Hedge Manager
- Settlement Processing
- Settlement Reconciliation
To create a new Entity Board Query in the Query Configuration Wizard, follow these steps:
Step 1: Select Query Type
Select the Entity Board query type from the list of data sources and optionally specify a name and output destination in the the top half of the Options page.
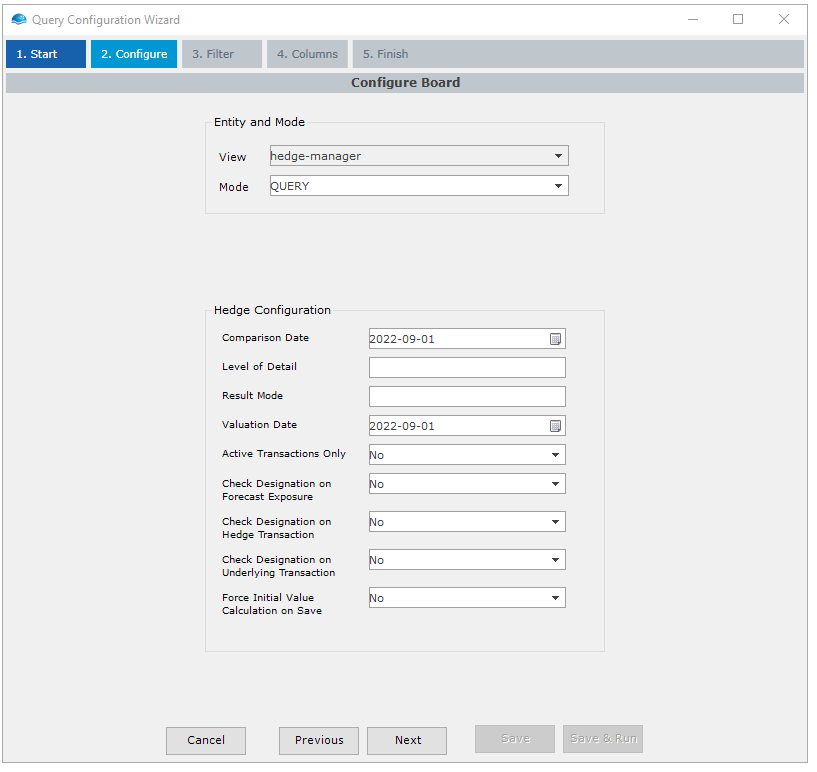
Step 2: Select a Entity and Mode
In the Configure Board window, choose the Entity and Mode parameters for the query. The Entity determines which application to extract data from (e.g. the hedge-manager) while the Mode generally determines what type of data that will be visible (e.g. ones in Verify, in Final or All).
Knowing what Entity/Mode to useIf you want to emulate a specific application then you can use the Application Manager in Wallstreet Suite to figure out what combination of Entity/Mode it uses.
Select an application while standing in the Detailed View and you can see the underlying command for the Transaction Manager; a Hedge Manager Admin uses for example the mode ADMIN and the view hedge-manager.
Some entities require further configuration, in which case an additional section will appear below when these views are chosen. Below shows the additional configuration necessary for hedge-manager.
Step 3: Define Query Criteria
The next step of the process is to define the Query Criteria or parameters for your query. The criteria will narrow down your query as fetching all data at once is generally not advised.
To define a a Query Criteria begin by selecting one or multiple columns that you want to filter on by toggling the checkbox next to them. Selecting multiple columns will create an AND statement.

Hedge Manager query that fetches Hedge ID 55342
After selecting your columns you can also optionally add an OR statement. This is done by right-clicking in the grid and selecting Add Row or pressing the down button while standing in the grid.
To remove a row you can right-click on it and select Delete Row and to remove a column you can press the X next to the header.
After the columns are added you can define values of the criteria by using the dropdown menu, typing them in manually or linking the criteria to a Parameter or Excel Reference.
More information about Parameterization can be found here: Parameterization
Any column values that are blank will be ignored.
Tip!You can use the same wildcards in OmniFi as in Wallstreet Suite, such as SKY% to fetch data for any Portfolio that begins with the prefix "SKY"
Step 4: Select Output Columns
The third step brings up the Configure Output window, which allows you to choose what fields to include in the query result.
The left-hand side contains a list of available fields while the right-hand side contains a list of selected fields. In both sides, fields are grouped according to the main entity and subentity, which can be collapsed and expanded.
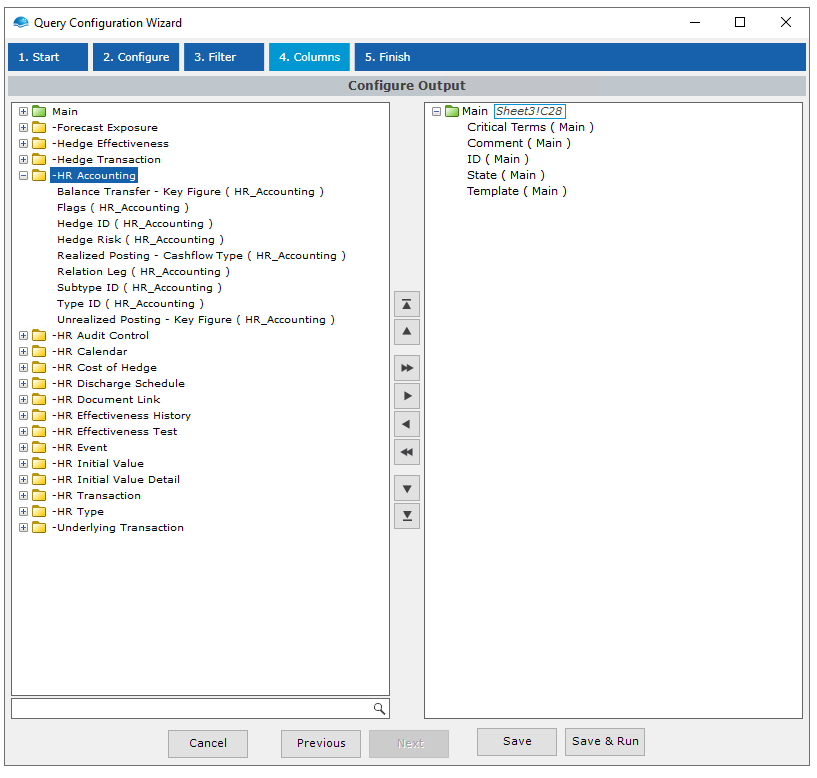
Selecting and deselecting fields
There are several ways to select and deselect fields:
- Double-clicking on the field
- Dragging and dropping
- Using the left & right arrows icons in the middle between the two grids
- Using Keyboard Shortcuts
The added fields may be sorted by using the up & down arrow icons in the middle between the two grids or by dragging and dropping them in place.
Configuring output destination
After selecting fields to include you can optionally define an output destination if you want the data presented in Excel directly from the Query. Each individual dataset (main entity or subentity) can have its own output destination defined.
Additional information and tips around the output of data can be found in the Transactions section Configuring Output Destinations
Step 5: Finalizing the Query
Choose Save to save the query without running it, or Save & Run to save and execute the query. If query output is defined then you will see your output in Excel.
Updated about 1 year ago