Excel Worksheet
The Excel Worksheet query is used to query data either from the currently open Excel workbook or another Excel file. It supports all common Excel formats (e.g. xls, xlsx, xlsm).
To create a new Excel Worksheet query in the Query Configuration Wizard, follow these steps:
Step 1: Select Query Type
Select the Excel Worksheet query type from the list of data sources in the Files-folder and optionally specify a name and output destination in the the top half of the Options page.
Step 2: Configure Excel Query
Choosing a Mode
The first option determines where OmniFi will extract the data from. There are three options:
- Current workbook queries from the currency workbook
- Other workbook queries from a different workbook than the current one
- Directory queries from the latest created Excel file in a specified directory
Relative Path
Under Other workbook is an option to use Relative path. This option allows you to specify a path of the workbook. The path will be “remembered” by OmniFi as in relation to the location of the current workbook.
In the figure above, say that the current workbook is located in
C:\Users\Relative Path Sample\Current Workbook Folder
On the other hand, the workbook which we would like to query is located in
C:\Users\Relative Path Sample
We can choose Relative path and specify the path for the workbook to query as
C:\Users\Relative Path Sample\Data to Query.xlsx
OmniFi will remember that this file is located one folder up from the current workbook directory.
Relative path is especially useful when sending directories containing reports and queries to other people as the queries remember where to look for the other workbooks relative to the path of the current workbook.
Choosing a Path
When using modes Other workbook and Directory, configure the path to the workbook or directory using the Path to external file box. You can either type the path or click on and navigate. Note that for Other workbook, the workbook needs to be specified, while for Directory, the folder needs to be specified.
The path may also be set to HTTP or HTTPS paths to access online resources.
Step 3: Configure Options
After choosing the mode and path (if applicable), configure the other options for the query.
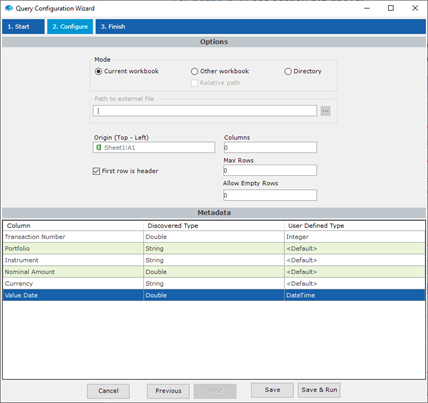
Origin (Top – Left)
For the query to locate the data in the workbook, the uppermost left corner of the dataset must be specified. To do this, type in the Cell Reference in the form of <SheetName>!<CellName> (eg. Sheet1!A1) on the Origin (Top – Left) box. If querying from the current workbook, you can also click inside the Origin (Top – Left) box, then click on the uppermost left corner of the dataset to automatically fill in the box.
Column (Optional)
In this box, you can specify how many columns you would like to query beginning from the Origin (Top – Left). If unspecified (left at the default value of 0), the number of nonempty columns in the first row will determine the number of columns.
Max Rows (Optional)
In this box, you can specify the maximum number of rows you would like to query. If unspecified (left at the default value of 0), the query will continue until a completely empty row is encountered. On the other hand, if specified, the query will continue until a completely empty row is encountered, or until the maximum number of rows has been reached.
Allow Empty Rows (Optional)
This setting determines the maximum number of empty rows (no cell on the row has a value) in the data set.
With the default value (0), the query reads rows from top to bottom until an empty row is encountered.
Changing the value to 1, the query will read rows until two consecutive empty rows are encountered. Setting the value high e.g. 10000 will ensure all rows in the worksheet are read.
Empty rows are omitted from the query data set, compacting the data to a format that is more usable with OmniFi reports.
First row is header
Tick this box to use the first row of the data as header. If not ticked then OmniFi will create column headers automatically based on their order (e.g. Column1, Column2)
Step 4: Previewing Metadata
In the figure above, notice that the Metadata section shows information regarding the data type that has been discovered for each column.
Excel represents all data as either a decimal number (Double) or text (String). These data types can be overridden by selecting a different one in the User Defined Type column, as illustrated by the columns “Transaction Number” and “Value Date”. To do this, simply click on the corresponding row and choose from the dropdown list. Leaving the User Defined Type as <Default> means keeping the Discovered Type.
Metadata can only be previewed when data is extracted from the Current Workbook.
NoteIf dates are fetched in the Excel Worksheet query then it's common that the user needs to define manually that they are supposed to be a DateTime, as the Discovered Type will generally be Double instead of DateTime. This is because Excel generally represents dates as a number (called OLE Date).
Step 5: Finalizing the Query
Choose Save to save the query without running it, or Save & Run to save and execute the query. If query output is defined then you will see your output in Excel.
Updated about 1 year ago